Thursday, July 4, 2013

Happy Fourth of July

Happy 4th of July everyone!  Since The Coffee Cup doesn't look very patriotic, I've snitched a photo from Facebook to share with you that fits today's celebrations perfectly.

This is a painting by Paige Bridges entitled "Vintage Patriot" and features a Holiday Rambler.  Paige will be featuring this sweet old red, white, and blue gal in her new 2014 Vintage Travels Calendar!


Happy 4th of July to all my camper and glamper buddies and always remember . . .

"Camping and Coffee . . . Life Is Good!"

Monday, July 1, 2013

Sweet Java Bunting

A couple weeks ago sister Becky brought me a sale flyer from Hancock Fabrics out of her newspaper.  Always on the lookout for coffee fabric at a bargain price, we struck out to see what they had in stock.  On the sale table was a big bolt of oilcloth that looked exactly like burlap coffee bean bags!  I calculated that I could get by with just a yard since it was so wide.  Using my 40% discount coupon, it totaled less than five bucks!

Since I found a cappuccino-themed picnic tablecloth at Walmart in early June on sale for $4, I knew this purchase would be used to make bunting for The Cup.  Some call it bunting and others call it a pennant . . . I call it easy to make and super cute!

I found a free fabric bunting pattern online from chickabug (a cute blog I thought you might like a link to), downloaded and printed it out to use as my template for the pennants.  I decided to go with the largest size at 7.75 inches.


With rotary cutter, mat, template, straight edge, and oilcloth ready, I set about cutting out 40 different pennants.  I know that I wasted some fabric, but I wanted to make sure that I captured the best aspects of the oilcloth pattern.


In no time flat, I had a stack of 40 ready for the next step in the process.  I went back to Hancock Fabrics on Saturday to find just the right ribbon to act as my binding strip.  In hindsight, I should have gotten something wider, but I went for price and color first.  Each $1.29 roll had 9 feet and I knew that would be a good length to attach to my awning.


At that point I needed help from the resident math expert, so I called on Wendy for my calculations as to where to place nine pennants along the 9 foot run and still have room on the ends to tie it off.


My next step was to fold the ribbon in half, iron it flat, and start sewing!  Wendy's measurements were spot on and in less than an hour, I had three finished pennants.  Since I don't have the awning put out, I simply strung one strand from the front window of The Cup to show you how they turned out.


With three strands of bunting looking like real burlap coffee bean bags, I cannot wait to glamp out The Cup by hanging them all the way around my awning next time I'm out camping!  

Thanks for coming 'round today and remember . . . 

"Camping and Coffee . . . Life Is Good!"

Friday, June 28, 2013

The Cup's First Collage

Evenin' everyone!  Not long after getting home from our maiden Java Journey together, I created The Cup's very first camping collage.  I've been doing these fun remembrances with SplashT@B since our first trip way back in 2007.  It's only fitting that I make them for The Coffee Cup too!  A click on the collage will enlarge it for you to see it a bit better.


Here's to all my camping buddies from Rob's R-Pod & Friends Rally!  Have a great 4th of July holiday and remember . . . 

"Camping and Coffee . . . Life Is Good!"

Thursday, June 27, 2013

Coffee Cup Thank You Notes


Being in an artsy-fartsy mood lately and having a need for some thank you cards, I spent the afternoon in my studio creating some coffee-themed cards.  I really didn't have a design in mind when I started, but one came together quickly once I got several sheets of plain and patterned scrapbooking paper pulled from my stash.

Several years before there was even a daydream of a vintage trailer, I was making an altered book with a coffee theme. Because of that, I had all the right colors of paper, lots of rubber stamps, and even a bunch of stamps I designed and carved myself. 

PUNCHED PAPER, MESSAGES & ACCENT STRIPS READY
ACCENT STRIPS AND ENVELOPES READY
FOUR NEAT RUBBER COFFEE STAMPS
ANOTHER TRIO OF RUBBER STAMPS 
COFFEE-THEMED STAMPS IN MY COLLECTION
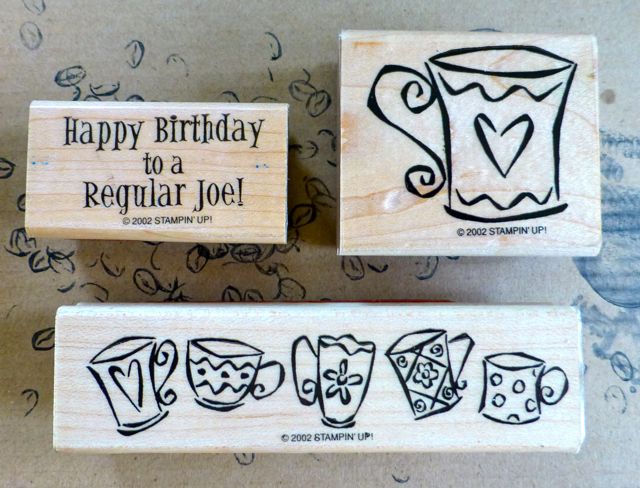
2002 STAMPIN' UP SET

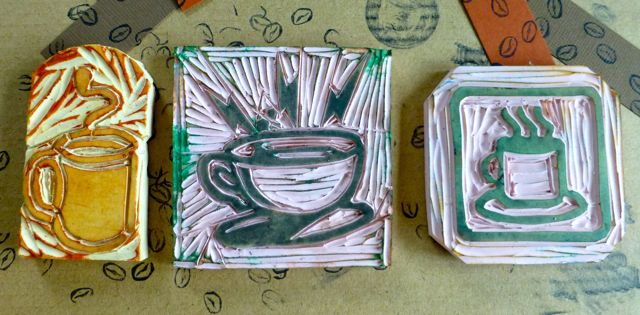
Rubber stamps can be pricy, so I decided at some point to make my own and it wasn't as difficult as you might imagine.  I made a dozen or so and they turned out quite well I think.

THREE COFFEE CUP DESIGNS
COFFEE AND TWO MUGS

After about an hour of stamping messages, punching out shapes, cutting paper stock, and taping everything together, I now have a supply of thank you notes ready to pop in the mail!

FOUR NICE NOTE CARDS
FOUR MORE IN MY SUPPLY

Thanks a latte for dropping by again today to share a bit of my Java Journey and remember . . . 

"Camping and Coffee . . . Life Is Good!"


Wednesday, June 26, 2013

Java Trailer Lights

OK campers, here are my homemade java trailer lights as promised!  Let me state right up front that I cannot take credit for these lights though since I snitched the idea from Pinterest . . . LOL.  Your supply list will be a short one, inexpensive one, so have at it yourself!!

SUPPLIES:

- Mod Podge {I used the one for fabric}
- plastic cocktail cups {I used Solo}
- X-acto knife
- fabric of your choice
- cutting mat & rotary cutter {plain ole scissors will work too}
- old paintbrush {Mod Podge can gunk up a good brush if not washed out quickly}
- string or two of outdoor Christmas lights with tiny bulbs

WHAT YOU DO:


1.  Make a template by rolling a plastic cup on paper and drawing the outline as you go.  I marked a starting point on the cup so I knew when to stop rolling and how far to overlap.


2. Transfer the template to a sturdier piece of paper like a file folder or cardboard so it holds up to multiple tracings.  If your fabric has a definite vertical pattern like mine did, mark your template so you cut it correctly each time.  If not, just trace and cut out any which way you want.


3.  With a fine point marker, trace your pattern on the reverse side of the fabric and then cut it out.  Here's where I used my rotary cutter and cutting mat, but a pair of scissors will work just fine.


4.  Grab your old paintbrush, then pour some Mod Podge in a smaller container.  I slipped my hand inside the Solo cup to hold it steady while I painted on the Podge.


5.  I put a nice even layer all the way around.


6.  With the X-acto knife, poke a hole in the middle of the cup on the bottom, then cut a cross.  I cut a couple before gluing on the fabric, but found out that it actually stiffens the cup a bit to do it after the fabric has been put on and allowed to dry.  


7.  While the Mod Podge is still wet, position the fabric and rotate the cup around so that the fabric sticks.  Work out any bubbles with your fingers.  I applied a little more Podge where the fabric overlapped to hold it in place.  After the fabric dried completely, I trimmed some edges to straighten them up.

 
8.  Let your lights dry overnight and then apply another layer of Mod Podge on the outside of the fabric.

9.  Push your small Christmas light through the + on the bottom of the cup.  I put a shade on every other light, but you can put one on each light if you choose.


I keep both strands of lights stored in one of my vintage train cases.  Here's one strand attached to the front of The Coffee Cup's window . . . 


Thanks for being patient as I located the photos and I encourage you to make some trailer lights unique to your sweet trailer!!  Have a great day and always remember . . . 

"Camping and Coffee . . . Life Is Good!"


Tuesday, June 25, 2013

Raffiaware Ice Bucket

I had intended to tell you today about the trailer lights I made for The Coffee Cup, but I cannot find the folder that has those photos and I'm too settled in for the evening to do a serious search for them.  Instead, I'll tell you about my most excellent find at the Sweeten Creek Antique Mall near Biltmore Village this past weekend.

I bet we hadn't been there five minutes when I looked down and sitting on the bottom rung of a step stool was the ice bucket.  I haven't been actively looking for an ice bucket, but was just hoping that I would run across a nice one on one of our junkin' junkets.  Unlike the sky-high prices at The ScreenDoor, the price of $18 was just right on this!


It's a perfect match for the beige raffiaware glasses I've been able to find over the past year, so I'm tickled to death with it.

I promise I'll locate those trailer light photos and share them with you tomorrow.  I've got several Coffee Cup projects in mind and look forward to showing them to you in the coming weeks also.  In the meantime, thanks for stopping by, and always remember . . . 

"Camping and Coffee . . . Life Is Good!"

Monday, June 24, 2013

R-pod & Friends Finale

Welcome back to another week of news from my sweet Coffee Cup.  Today I'll give you a final report on my recent camping trip with Cousins Rob and Trisha at their R-pod & Friends Rally.  

As you know, it was our maiden voyage together and it couldn't have been more perfect!  The entire five days were filled with friends and food and fellowship . . . camping-style.   

It gave me an opportunity to start a collection of Coffee Cup camping photos, trade names and comments from folks who wanted to peep inside for a tour, show off items I've made and collected for her, answer questions from oodles of curious campers, go junkin' for treasures, and simply relax and have fun! 

EARLY SUNDAY MORNING IN THE HOLLER
TAKING MY TIME PACKING UP FOR HOME
TRAILER LIGHTS MADE FROM SOLO CUPS & FABRIC
JUNKIN' FINDS: CAMP STOOL & TABLE, COFFEE TIN, BROWN THERMOS
SATURDAY AFTERNOON HAPPY HOUR AT MY "HOUSE"
Thanks for stopping in on this last Monday in June.  If you happen to have a bit of time to come back tomorrow, I'll share some information with you about those cute little trailer lights that were hanging on The Cup's front window.  Ta ta from me and The Coffee Cup!!


"Camping and Coffee . . . Life Is Good!"