Sunday, July 8, 2012

Sister Letters & Numbers

Hey everyone!  I hope you had a fantastic 4th!  

It's awfully hot around these parts, so I haven't done much camping lately . . . only junkin'.  I'm always on the hunt for some neat Coffee Cup item and look what I found this past Friday at Gibson Mill Antiques in Concord, NC . . .


I was walking past a booth of chippy, metal items and spied a whole bunch of enamel letters and numbers.  Usually when I find things like this, there's at least one missing that I want.  But this time I was successful in finding exactly what I needed!  

Both the yellow letters and red numbers are 7 1/2" tall so they will show up nicely somewhere around the campsite.  My plans are to create a funky, artsy-fartsy sign featuring Sisters on the Fly, my Sister number, along with some other items.  Here's my inspiration . . .


One of these days when you stroll back around for a Coffee Cup update, you'll see my final product.  Until then . . . have fun, be safe, and camp on!


Sunday, July 1, 2012

Coffee Cup Coaster Project

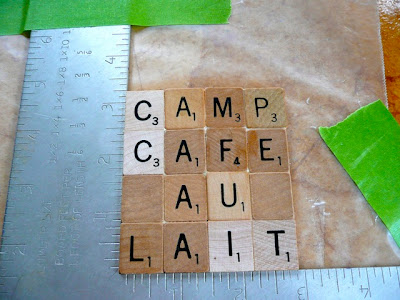
I finished an ongoing Coffee Cup project this weekend.....wooden coasters made from Scrabble tiles.  They are so simple to make.  The hardest part was finding enough tiles to complete the words!  I bought some tiles off of eBay and found some at an antique store in Franklin, TN.  Every time Becky and I go junkin', I look for them.

Here's the supply list:  Scrabble tiles, quarter-inch cork sheets, wax paper, wood glue, water-based polyurethane, metal square, painter's tape, and small paintbrush.


Here's what you do:  
1) select tiles to spell out four-letter words for four rows 
2) lay down a sheet of wax paper, put the metal square on top of wax paper, and tape it to the table
3) run a thin line of wood glue along the sides of bottom row of tiles


4) push tiles together, squeeze out excess glue, and wipe it off with a damp rag
5) hold each row of tiles tightly in place for a few minutes to allow the glue to set
6) add the next three rows, repeating the process with each row


7) let the wooden tiles dry overnight
8) cut out a piece of cork to fit the back and glue it in place with wood glue
9) let the cork and wooden tiles dry overnight
10) apply a coat of polyurethane to the sides and top
11) let dry completely and add three more coats, allowing each to dry


I decided to put the word "camp" at the top of each coaster and it was fun to see how many coffee-related words I could come up with.  Here's the final product...


Don't you want to make some for your vintage trailer or camper?  Well, what's stopping you?  Have fun and I hope you enjoyed my little Coffee Cup coaster tutorial.